
Nothing just like the satisfaction of employment well done. Standing there, arms at your sides sort of a superhero, cernuous and patting yourself on the rear. All of that you’ll sure do standing on your new tile floor. However, Tucson Tile Installation coating your own floor will be an attractive and satisfying project for the do-it-yourselfer to try, it’s one that’s crammed with areas for potential mistakes.
In this two-part series, we’ll walk you through the most steps, as well as key tools and pitfalls to appear out for in your tile install job, as you’re taking a run at prepping, coating and grouting.
Part one can cowl the foremost necessary and sometimes the foremost unnoticed step: preparation. Like several DIY/home improvements, coating depends heavily on the correct surface and substrate preparation. to mention that it’s crucial would be an underestimation and that’s why it gets its own special part of this series. half 2 we’ll bear the meat of the way to really tile and grout a floor.
So let’s jump in and take a glance at what you’ll get to begin making ready your floor for tile installation, as well as the tools and a few things to appear out for once attempting this primary stage of the project.
Prep the Subfloor
If there’s one step that’s the foremost necessary, it’s this one. This one is vital. 1st things 1st, what specifically could be a subfloor? It’s a catch-all term for the ground beneath your finished floor. 2 primary sorts of subfloor: wood and concrete. each suffers from an equivalent tile-killing issue: movement. Wood moves and flexes with humidness and temperature changes; concrete will move to bet on humidness, moisture, soil movement, and temperature.
Pier & Beam House: wood Subfloors
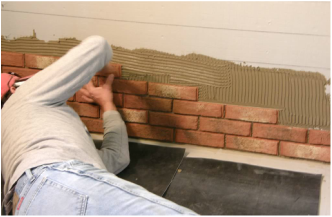
Remove any staples and drive down any screws or nails that square measure protrusive up too so much. Install a cement supporter board to line an honest base for your tile and forestall any movement-related cracking of tile or grout.
Backer board is screwed all the way down to wood subfloor victimization specific supporter board screws and mortared down with tile adhesive mortar laminate subfloor. keep in mind to tape and mortar the joints between the items of the supporter board. The crack bar membrane is mortared down on each surface. This membrane additionally acts as a waterproofing membrane and could be a useful addition in a very wet space, a second floor, or a laminate subfloor application. A notched trowel is employed to unfold the mortar at a 45-degree angle to the laminate subfloor.
Concrete Subfloors
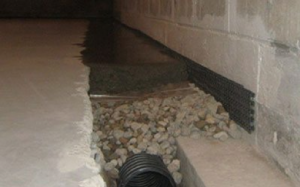
For concrete subfloors, certify you take away unspecified adhesive, and patch/fill any cracks with the acceptable product (check your native home improvement store or reach bent your sure friends at the nice Guys for tile and installation merchandise. The suggested patch item varies supported the scale of the crack to be filled). Use a floor hand tool to get rid of any loose junk. For recent adhesives or mortar, this could need some labor and presumably a grinder to get rid of from the subfloor and permit the new mortar to bond. Floor tiles will be put directly onto a concrete subfloor.
Industry standards incorporate a “steel trowel and fine broom end.” For tile directly over concrete block. This technique also can be used with epoxy mortar and grout, organic-floor kind one adhesives, and organic compound mortar and grout. Waterproof membranes/anti-fracture membranes also can be used on concrete slabs if desired or needed. As always; follow the maker’s recommendations rigorously.
The tools necessary for this kind of installation embrace mechanical scarifiers, improvement tools, buckets, sponges, notched trowels, margin trowels, and layout and marking tools. This technique, by itself, mustn’t be used on the concrete subject to bending stresses like “structural concrete” or “post-tensioned concrete.”